Wells Fargo Merchant Services: A Small Business Guide
Thinking about Wells Fargo merchant services? This guide breaks down the costs, contract pitfalls, and features to help your small business make a wise choice.
QuickBooks is an accounting software package created by Intuit. It offers solutions for managing personal, business, and tax finances.
As with any new software, getting the most out of QuickBooks requires some learning.
This guide provides an overview of QuickBooks and how to get started. It covers the steps needed to set up QuickBooks and to start creating invoices.
Please note that this guide is for QuickBooks Online. There are some differences between it and the QuickBooks Desktop and Mac versions.
Connect QuickBooks and Wise:
Save time on reconciliation
| This piece has been written in collaboration with Esther Friedberg Karp, an esteemed bookkeeper and Advanced QuickBooks ProAdvisor. |
|---|
Businesses can use QuickBooks to automate invoicing, payments, and accounting.
The first step to using the software is selecting the right subscription package.
For example, small businesses with international customers may choose to use QuickBooks Essentials, Plus, or Advanced. These subscription levels include the Multicurrency feature, which helps track international transactions.
To use cloud-based QuickBooks Online, you need to sign up for a monthly or annual subscription. You can also take a 30-day free trial to ensure it meets your needs.
There is also a mobile app available for various platforms such as iOS and Android. This can be used for obtaining accounting information, such as income and expenses, on the go.
In the sections below, you can learn how to set up and use specific features of QuickBooks as a first-time user.
| Find out: |
|---|
The initial setup of QuickBooks is very important. Before you use it to create invoices or track payment and expenses, you need to enter your business and basic accounting details.
The following are the main steps:
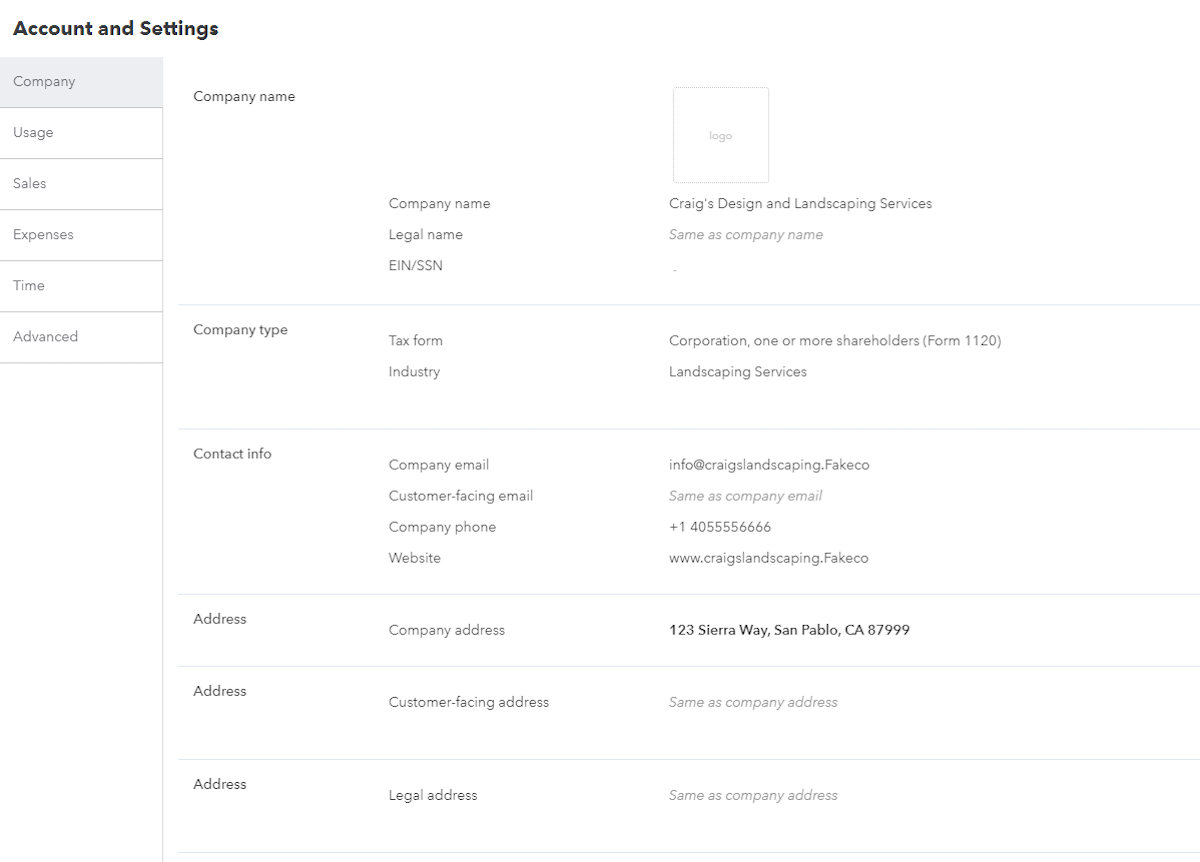
Go to: Gear Icon [⚙️] > Account and Settings > Company
General business information needs to be set. This includes company name, address, email, telephone, and website.
This information can appear automatically on invoices and other sales forms.
Go to: Gear Icon [⚙️] > Account and Settings > Accounting
The fiscal year is the 12-month accounting period for the company.
This can be set as January to December or any other 12-month period. The US federal government’s fiscal year, for example, runs from October 1st to September 30th.¹
Go to: Gear Icon [⚙️] > Account and Settings > Accounting
It is essential to set whether QuickBooks will use cash or accrual accounting methods.
Under the cash method, you record income as it’s received and expenses as they’re paid.
The accrual method counts income when invoiced(whether or not funds are received yet). Likewise, it counts expenses when bills are dated (whether or not bills are paid at that time). Accrual accounting is required for tax purposes by companies tracking inventory.
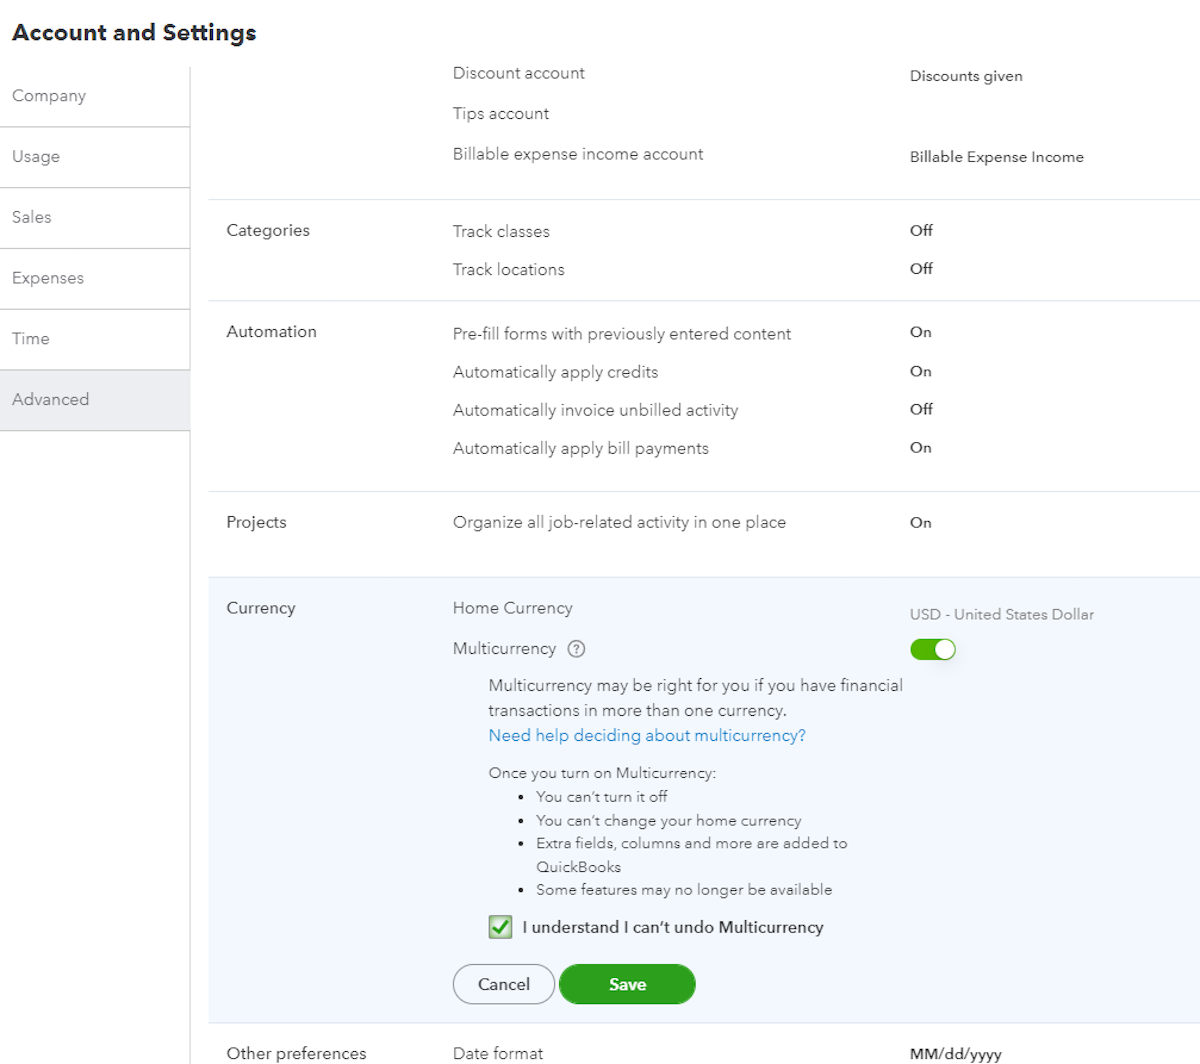
Go to: Gear Icon [⚙️] > Account and Settings > Advanced > Currency
Here, you choose the main currency used for company accounts.
There is also an option to select “Multicurrency.” This allows you to track transactions in foreign currencies – very useful if you have overseas customers or vendors.
If you plan to use the Multicurrency option, you must ensure that the home currency is correctly set first. You cannot change it after selecting Multicurrency.
Go to: Dashboard or Gear Icon [⚙️] > Account and Settings > Company
Adding the company logo adds a professional appearance to invoices.
As with the basic company information, this can be set to appear on all invoices and sales forms. The logo can also be set to appear on reports.
Go to: Gear Icon [⚙️] > Account and Settings > Sales > Sales form content
All invoices should specify the terms for payment.
This will inform the custom by when to pay the invoice. It forms an important part of the customer relationship and the legal basis of invoices.
Depending on your business, this could be set to immediate payment or payment on a specific date.
The payment terms you set here will become the default. You can change the terms for each invoice when created.
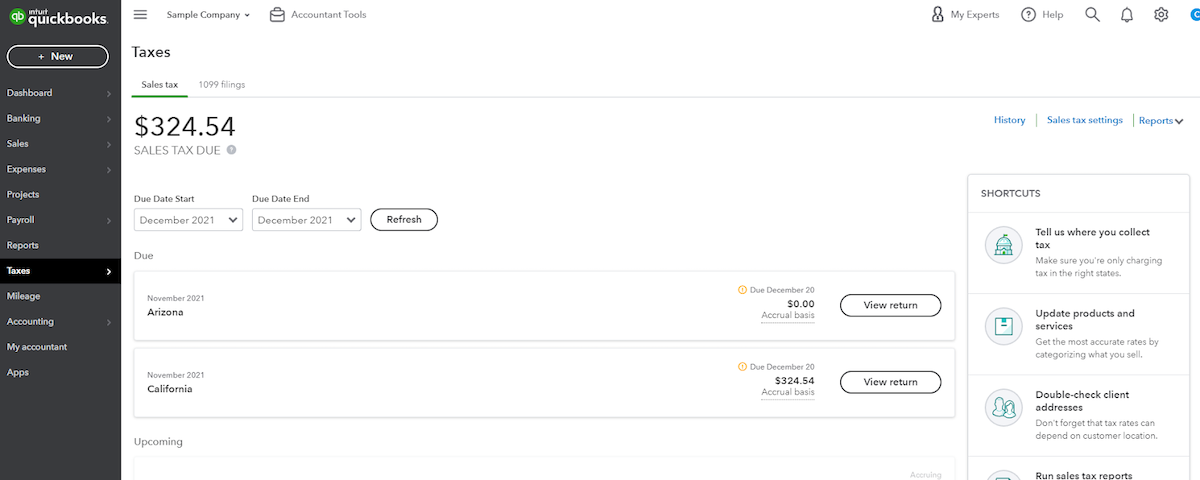
Go to: Tax Tab
You will need to add sales tax details if you sell products and services.
Sales tax needs to be defined by jurisdiction such as state, county, and city. Once populated here, you can then specify it for specific products and services in the appropriate form.
QuickBooks Online also offers automated sales tax, because there are literally thousands of sales tax jurisdictions in the United States. This option is often simpler for businesses.
Once you have set up your basic company and accounting details, you are ready to start using QuickBooks. The next steps are to prepare QuickBooks to create and send invoices and to access bank accounts.
The following is an overview of the main steps to use the system to send invoices, pay bills, and track expenses.
Go to: Gear Icon [⚙️] > Custom Form Styles > New Style > Invoice
The invoice is a very important part of customer interaction. You want this to be accurate but also appealing and easy to understand. It forms part of the audit trail for invoice payments and other related interactions. Just as importantly, it should aim to get customers to pay on time.
Customizing your invoices will make them stand out and be identifiable to customers. QuickBooks allows this for many areas – not just the logo you added in the initial setup. This includes:
Appearance and format. You should set up the appearance and style as it suits your company.
Language and tone. Likewise, you can edit the default text and phrases to match your company style.
Data fields. Decide on the amount of information to display, and set this up as a default template.
Go to: Gear Icon [⚙️] > Custom Form Styles > New Style > Invoice
Providing a direct payment link to customers is a proven way to get faster invoice payments. QuickBooks supports this.
As part of customizing invoices, a “Pay Invoice” button can be added that allows customers to pay directly. This will link with payment methods (such as credit card, debit card, or ACH transfer) and accounts added.
Go to: Banking > Add Account or Connect Account
You can connect your online bank and credit cards accounts to QuickBooks bank feeds to track transactions that clear the accounts automatically. Alternatively, you can use manual uploads of files from your online bank and credit card accounts, but syncing automatically is much faster.
Adding an account is simple. After selecting “Add Account,” search for the name of the financial institution and enter your login details.
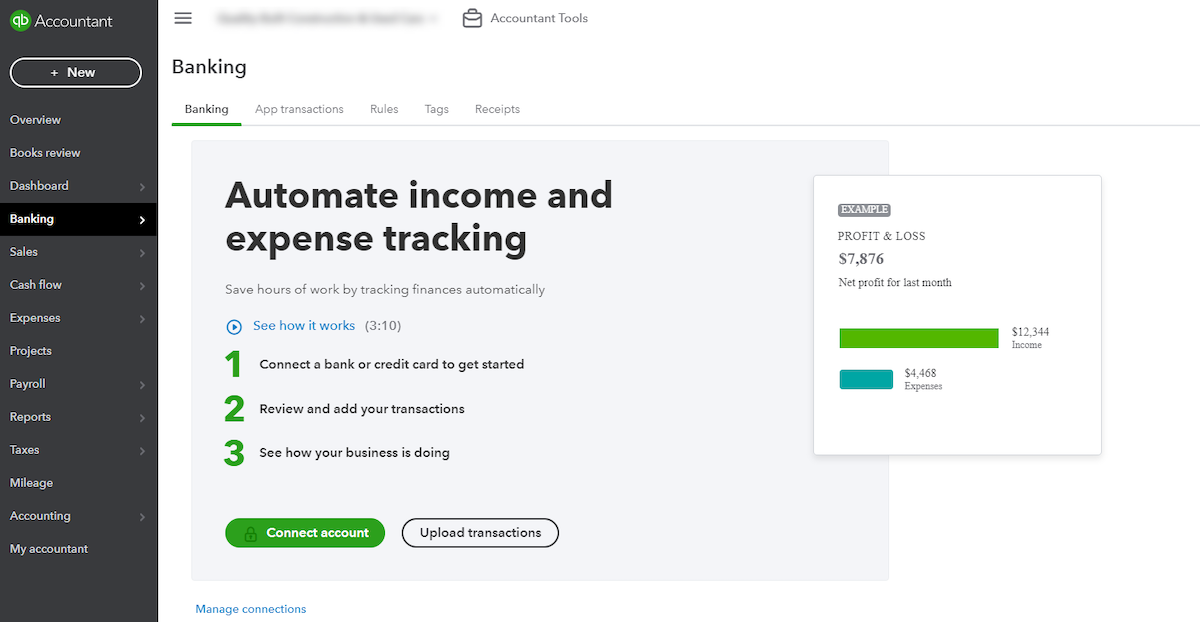
If you have international transactions, you can connect to Wise Business.
Go to: Global Create [⚙️]> Invoice
Once you have entered business details, customized invoices, and set up payment methods and terms, you can create an invoice.
Selecting “Create > Invoice” will create a new invoice based on your default template. It can be set to be populated automatically with the company information, logo, and payment details as you entered previously.
You then enter the details of products and services supplied and select the sales tax.
Products and services can be set up first or added manually onto the invoice. To set up standard products and services, go to “Invoicing (or Sales) > Products and Services.” Here, you enter the relevant details for each product. This includes name, category, SKU, price, and sales tax category.
Invoices are sent from the same section where they are created. Once the invoice is complete, simply select “Save and Send.”
You can, of course, also save the invoice for further editing or to send later. It is then accessed later from the “Invoicing (or Sales) > Invoices” menu.
Adding account details and direct payment links to your invoice is a great way to get paid faster.
For example, you can add your Wise Business account details and get paid like a local in ten major currencies. This makes receiving international payments a breeze.
QuickBooks also offers a solution for automatic bill payment. Bill Pay allows you to pay any bill – including vendors or freelancers – from within the platform.

Managing, tracking, and paying bills is a time-consuming task for many businesses. Making payments late can be a costly error, too.
A solution like this can be a great time-saver and can protect your credit score.
Research from FICO shows that a single late payment can drop a credit score by around 100 points. This will vary depending the on initial credit score and severity of the missed payment.²
To access Bill Pay, click on the ‘Bill’ or the ‘Pay Bills' feature in the application. You can make a single payment or set up future payment schedules. Payments can be made using your linked bank accounts or by credit or debit card.

There are also many other useful features in QuickBooks. Tracking business expenses is one of these.
As mentioned earlier, you can connect QuickBooks to your accounts, including bank accounts, credit cards, PayPal, and more. The bank feeds will then import the transactions as they clear the accounts and allow you to match them to already-entered transactions, or to create new ones
You can also manually upload or email receipts, and they will be matched to existing transactions or create new ones.
This is not just a time-saving alternative to receipts and spreadsheets. It helps with tax calculations and managing business cash flow. It also speeds up the vital step of reconciling bank and credit card accounts.
QuickBooks is designed to be used without accounting software experience. It can be used by small business owners, as well as larger companies.
However, as with any accounting software, there is a learning curve to mastering it. Beginners, though, can easily use the platform once they have learned the key features.
There is plenty of material available to help you learn how to use QuickBooks independently.
For example, there are guides available when using the system. In addition, Intuit provides many tutorials and videos to build and test your knowledge. You can learn broader topics such as small business accounting tips, but also very specific details such as how to enter invoices.
QuickBooks has gained a vast amount of user experience and feedback over the years. Q&As from the QuickBooks community can help answer specific questions.
|
|---|
Accounting can be a pain. Investing some time into learning how to use QuickBooks can save you time and effort in the long run. It can also ensure that the numbers you see on reports are accurate.
This is especially true if you use the online bank connection feature. Doing so can save a lot of time in managing transactions and receiving payments - as long as you use the bank connection (feed) feature properly.
If you have international transactions, you can add your Wise Business account details to the invoice to get paid with ease.
What's more, you can also sync Wise with QuickBooks.
Once connected, all bills you create in QuickBooks Online will automatically sync in real time to Wise, where you can choose which ones to pay.
All bill payments you make with Wise will be matched to the original bill in QuickBooks. As simple as that.
 |
|
All sources checked December 20, 2021.
*Please see terms of use and product availability for your region or visit Wise fees and pricing for the most up to date pricing and fee information.
This publication is provided for general information purposes and does not constitute legal, tax or other professional advice from Wise Payments Limited or its subsidiaries and its affiliates, and it is not intended as a substitute for obtaining advice from a financial advisor or any other professional.
We make no representations, warranties or guarantees, whether expressed or implied, that the content in the publication is accurate, complete or up to date.

Thinking about Wells Fargo merchant services? This guide breaks down the costs, contract pitfalls, and features to help your small business make a wise choice.

Streamline your Amazon business with a reliable 3PL for FBA sellers. Improve shipping speed, reduce costs, and scale your operations with expert logistics.

Learn how to use Square as a US sole proprietor. Discover how to accept payments, set up your account without an LLC, and manage your taxes.

Need a business loan with no credit check? Quick funding explained. Learn costs, risks, and alternatives to secure capital for your small business.

Ready to use Stripe as a sole proprietor in the US? Learn how to set up your account, handle taxes, and accept payments without an LLC.

Discover which US banks offer Zelle for business accounts. Learn about the benefits and understand its limitations for your growing business.